Wednesday, 8 August 2007
wow - that's fast! Wheel Bearings
My bearings arrived today. They said allow two days but I got next day delivery! They look the business. They arrive with rubber seals and I am not sure whether to leave these on. Will keep you posted, but in the meantime I can highly recommend Arc Euro (see their link below).


Tuesday, 7 August 2007
sourcing parts

I learnt a valuable lesson today, which is that if you source parts from a classic car parts supplier you will pay top dollar for something which may be available elsewhere as something more mundane.
I initially contacted a well known classic car part supplier and was quoted a wopping £25 per ball race to go in my front wheels....that's £100 worth! He said he didn't actually have an kits for J Types, but that the bearings are common to other vehicles, and suggested one. He suggested I checked the numbers on the originals and get back to him.
I did check the numbers and I Googled them and found a source, Arc Euro Trade Ltd....rang them to check the details...and ordered all four races (inner and outer x2) for £25, including postage! They normally do stuff for model engineering, which put me off, but the part numbers are right and the dimensions seem to work...so we will see.
That is a useful saving because I then talked to a radiator recoring company and the price for that is about £80 more than I anticipated. I shall be blogging the re-coring process; they say I can watch it and photograph it!
The bearings should be here in the next two days and I shall then finish the front axle.
Leaf Springs

I try to make at least some progress on the 101 every day, even if it doesn't seem a hell of a lot. I started out by putting a line of weld around the patch on the inner R/H panel and then I finished cleaning up the individual leaves of my two front leaf springs. As they are £300 a pair for replacements I thought I'd see what I could do to just clean these up. I have no idea if they will be springy enough.
I had to remove the cold rivets by first grinding off the dome heads then removing the studs using the 12 ton press, which made a hell of an alarming noise each time when it gave - so that I had to keep reassuring myself that the leaf had not broken.


I next need to find out where to get cold rivets and the correct procedure for making shackles like these, presumably by applying heat to the metal before bending it. I also wonder about the tube around the bolts. Anyone know?
Friday, 3 August 2007
Plate - top - blanking radiator (Part # AMK5053)


After making adjustments to the radiator frame I made this upper panel. As I am not quite sure of the purpose of the slots, I have marked but haven't cut them. This is because the shrinkage caused by my bending may have slightly moved them and I think it might be best to cut them when fitting the panel to the van later.
This reminds me of the development of the Bensen autogyro. Bensen acquired the plans for the Hafner rotochute, a one man aerial assault rotor glider designed by the man who was the subject of my dissertation for my degree, Raoul Hafner, later the designer of Britain's first helicopter, the Bristol Sycamore. Hafner designed the rotochute during the war with a hook affair under its main chassis longeron. Unsure what this was for Bensen retained it in his design, which he marketed as a civilian gyro-glider. It was later revealed that the redundant mechanism had been intended as a means of carrying a Bren gun under the aircraft.
I don't think my panel slots are redundant, but until I am sure what they are for I won't cut them.
Tomorrow I shall make the Panel- interior - front R/H, using the original as a pattern, then go back to working on my front leaf springs, which are dismantled and half de-rusted, but which need finishing before I work out how to make the shackles and get hold of cold rivets.
Thursday, 2 August 2007
bending - an exercise in problem solving


Today I cut out the net, bent it into shape and welded it up. The whole exercise was a problem solving one because all sorts of packing and forming was needed to create the right bends. It isn't finished just yet, as some finishing grinding is needed in some places and a tiny bit of welding is needed, but on the whole it came out very well.
When I popped up to the house for a break I checked the Tinworm mailbox and was pleased to hear from a man in Australia.... in Victoria, which is where my sister lives. He complimented Truman and me on the trouble we are going to to do proper restorations of our J Types. He is restoring one over there. Thanks mate. Keep in touch.
When I have finished the radiator frame tomorrow, I think I should do the inner panel R/H and then the upper radiator panel. Really chuffed with progress.
radiator frame


This afternoon (1st August) I clipped up a scan/print-out from my Parts Manual (15 on Plate CA) showing the radiator framework and studied the real thing, made measurements and marked out the net on some cold rolled 1.2mm sheet steel, cut out the basic shape with an angle grinder and fine cut some of it with my roller guillotine. I didn't use engineer's blue this time, but permanent marker, even though there will be a degree of error as the nib is quite large; but then again, much slack will be taken up by bending. I'll cut, bend and weld it up tomorrow.

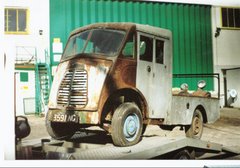
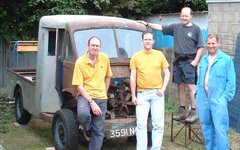
Above you can see the radiator bay of the Goat Lady's van, which ironically, considering it had been abandoned in a field for 40 years or so, is in better condition than mine was when I got it; in fact my van had lost its radiator altogether. I am pointing to panel 20 [in drawing, top. Click on image to increase size] and most of the lower panel has gone, though you can see some of it to the right of the tap. I rescued the panel I am pointing to. I was excited because my van had lost this. It will be a pattern for a replacement to be made in the next few days.
Wednesday, 1 August 2007
Panel- interior - front top L/H part # ANK2604

Today I made a replacement inner panel, the one the Parts Manual calls the Panel - interior - front L/H, from virgin heavy gauge cold rolled steel, which is the first bit of unrecycled steel I have used in years, now. I made it using the old, rusted panel as a pattern.
A mate (and his trailer) and I went to a stockholder a few days ago and I bought two sheets of 1.2mm (2x1m). I think I ought to have got a slightly lighter gauge (as the original material was thinner) but I am delighted with the strength of the panel I made today so I think the cab can only benefit by my decision.


I am so inspired by the result that it would seem churlish and a compromise to the finish not to replace the inner right hand panel as well. That is the job for tomorrow.
Incidentally, I was chuffed to bits to be told by Iain Mckenzie that I had done a good repair along the inside beneath the windscreen. He also tells me that he has my valence on his desk and will be sending it. Anyone who has not seen his work, which incidentally is excellent value for money, should take a look.
Incidentally, I was chuffed to bits to be told by Iain Mckenzie that I had done a good repair along the inside beneath the windscreen. He also tells me that he has my valence on his desk and will be sending it. Anyone who has not seen his work, which incidentally is excellent value for money, should take a look.
Subscribe to:
Posts (Atom)