Wednesday, 26 September 2007

Latest in the wheel saga


Went to collect wheels a day later than planned and there was already some evidence of corrosion (black patches). Mea Culpa; should have got them to prime them after all. Phil explained the necessity of primer for protection, within half an hour of blasting. The situation was saved by the fact that some of the wheels still had unremoved crud on them, which had been overlooked and Phil said he'd re-do them.

Then we started talking about paint and got on to how he has spray facilities there. He showed me some work they are spraying now: benches, etc., and he'd previously showed me the finish he'd got priming wheels and the finished surface of a gantry. All pretty good stuff.

I explained that the reason I had wanted to do priming and painting myself was not money saving, but because they are going to need some hammering around the rims, where they are dented. So he suggested I take them away, do the hammering and, when happy, bring them back and he will blast them again, prime them and paint them for me for £20 a wheel. It isn't two pack (but it'll be £100 cheaper. £30/wheel to two-pack would have been possible if I'd first blasted them: that's £40/wheel x 5= 200, as against £100). They won't be concours, but I reckon he will get a pretty good result and save me some hassle, as long as he does a proper job of getting the rest of the crud off.

They will be semi-gloss black....ready for tyres. I reckon that is a result.

Right, I need to get on with rim bashing.

Monday, 24 September 2007

Wheels

Delivered the wheels to P&P and asked them to just blast them. I'll prime and paint them myself. Warned off Hammerite and advised to use spray-on etch primer.

He showed me some wheels which they had finished. They looked excellent but of course I have no idea what they looked like before they were done.

The wheels will be ready tomorrow afternoon, same time. Fast turn-around.

Sunday, 23 September 2007

Decided about wheels

Right, been thinking about wheels and decided to paint them myself and save the £150-200 that a professional job would have cost me towards the tyres. As a friend said, I am not aiming for concours condition here. Also, if they do get a bit chipped when tyres go on, touching up will be no big deal. I might get P&P to not prime the brake side of the wheel, and I'll hammerite it instead, as that side gets lots of crud and wet thrown up from the road.

Friday, 21 September 2007

Shotblasted Wheels

Blimey! No more buggering around with abrasives, dust, frustration....and not quite getting the results I want either! I just talked to the guy at P&P Services and they will blast each wheel for £10 and prime for £5....total for 5 wheels = £75. And they will turn them round in about three days. I'll take them up on Monday.

Then I need to decide whether to get Brian to two-pack them for £150-200 or spray them myself, a la Practical Classics. There's a lot to be said for the professional job, but right now I need to slow down on the money-spending, especially as I now need to get a new sender unit; and tank repair kit, which will set me back £45 plus postage.

Fuel tank next to exhaust

Last night I started stripping the fuel tank I got from Magpie (because mine had horrible holes in it) and the paint and crud is coming off nicely. I got to thinking about where it is positioned on the van. Friends say I am overly safety conscious, but does nobody else think that positioning the opening of the exhaust right under the extension tube to the fuel tank filler tube was asking for trouble?

In practice, vans had extension tubes which cleared the van sides, so that rather than pouring exhaust under the chassis, it came out the nearside, slightly to the rear of the filler, but all the same, right near any fuel drips.

Thursday, 20 September 2007

Valance


I answered the door early this morning, bleary-eyed, to see an exciting package on the doorstep: my valance! I've been looking forward to this. I ordered it a few weeks ago from my metal guru, Iain Mckenzie and he has done a grand job of it, as you can see.

The valance at the top is the original, bent beyond sensible repair and hardly worth the effort (take it from someone who's tried) when you can have a beautiful replacement like mine for £45 - with curves in all the right places and made from virgin metal! It came with a top panel (£8) which is the part on which the horn is mounted.

Thanks Iain!


Wheels and Tyres

Here is a very poor quality film (from my phone) of the old tyres being removed from the wheels at X-Spurt Tyres in Hervey Street, Ipswich. The guy said it was ok to put him on my blog because he is online in several different places, which boggles the mind. He was helpful on the subject of wheel painting. He says that with their technology, there is no reason why the rims should get chipped, as I feared, when the tyres are put on. His mate also said that they'd clean up the rims for free when they put tyres on, so I reckon I'll be going back

That said, I also went over to see Brian at B&M Car Body Centre to sound him out on the cost of 2-packing the wheels and he reckons if I can get them prepped he may be able to get the price down to thirty quid a wheel. For prepping, X-Spurt recommended a bead blaster and Brian mentioned a guy whose opeation is at Sheep Drift farm: P&P Blasting Services. I went along but they were not in. I did wonder if I'd be too small fish for him , as some of the plant standing in his yard was huge (what looked like a classic crane and a sewerage pipe....all cleaned up nicely).

I might not need X-Spurt to do the rims, but they removed tyres from all five wheels for a tenner.
So thanks, guys. I hope to be coming back to get tyres when the wheels are ready

I started cleaning the wheels up last week and without a shot blaster they take a heck of a long time and the result isn't fantastic. I read an article in Practical Classics about doing the wheels yourself with primer and spray paint, but I bet they didn't start out with wheels like these. If I get them blasted and if that costs a lot, I might possibly go for the DIY option on painting.


Saturday, 15 September 2007

A visit to Magpie's

On Tuesday, on a journey back from visiting my dad, I stopped in on Magpie to collect a fuel tank and some wheels....and to see his vans and compare notes.

Magpie and ROD 525

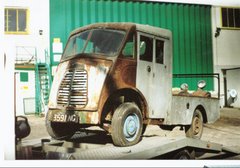
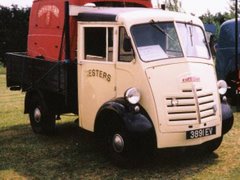
I was particularly pleased to see ROD 525, the tradesman's J Type truck, which Truman and I had hoped to buy together earlier this year. Seeing it brought home to me just how utilitarian some J Specials were; designed for the job but with no frills. It was inelegantly put together and roughly patched throughout its working life. This in turn makes Magpie's restoration philosophy fit so well. Some, he says, criticise the way he will hand-paint his cabs with brushes or rollers, and the way he will use pattern or even just compatible parts to get his vans mobile again...rather than being a purist.

Truman and I have talked about this before...and I have written about it. I like any classic vehicle to look authentic....to look as it did when it was working, rather than when it left the factory; and I especially dislike a vehicle which is claimed to be "concours" condition, or worse still, "better than when it was manufactured". So I have a lot of time for Magpie's attitude.

People may criticise the restorer who "bodges" (Magpie's word, not mine), uses non-original parts or paints his vans with a hand-roller, but what Magpie does is rescues rare vehicles from barns and rust-piles and gets them working and running again quickly, which has to be what it is all about. And if they look a little worse for wear, well, didn't they always? These were workaday vehicles, which is precisely why they are so rare today; nobody thought to preserve them....they were too ordinary.

Magpie was very generous (coming home from work to see me) providing me with parts, contacts and tips and even a set of photos which he took when his van was used in the Dr Who episode, "The Idiot Lantern". I had no idea the Tardis was a flat-pack, did you?


Let me know if you fancy a set of 50 behind-the-scenes pictures of the making of the episode featuring the van. I think Magpie is asking £10. He is also doing Code 3 models (based on Corgi J) of the van, which will be a rare limited run. (I'll forward any enquiries).


I took some photos, especially of ROD's roof. I think I shall be using that technique - wood frame. Other points of interest were the fact that ROD had a small running-board, so that the step area could be boxed in, and she had an abbreviated passenger seat, necessary when you have an off-set engine in the cab.

Looking at the photo below, It has just occurred to me that, as well as boxing in the step area, the last user moved the near-side seat over to the left of the cab so that it sat above the step (rather than to the right of it). This will have helped greatly with the problem of space for a passenger within a cab accommodating an engine. I don't think I'd want to lose the step, or have a running-board, but I wouldn't mind having an off-set seat, and that might be possible if I made it one which folded down from the space behind the door.

Thanks for the hospitality, Magpie!

Thursday, 6 September 2007

Wheel Sizes and Tyres that fit them

(left click on images to enlarge them)


I am hoping to visit Magpie next week to see his collection and collect a fuel tank I bought from him on ebay and a couple of wheels which he is all but donating to the project. Measuring the wheels that I have revealed a misunderstanding on my part about how tyres are sized...and when you think about it it is painfully, embarrassingly obvious, but in case anyone else is unsure, here's how Magpie explained it:


".....a common error. A 16" tyre won't be
fitted to a 16" rim; it would fall off. The wheel rim
is bigger as the tyre edge sits inside the rim of the
wheel. Tyres are measured by the diameter of their
hole, so a J Type RIM measured diagonally will be
larger than the tyre size that fits it."

DOH!

Sunday, 2 September 2007

Outrigger Brackets


I may have slightly over-engineered this, but as these brackets had rotted to the point where I had lost my outriggers altogether, I decided to produce new ones which will still be with us in another 50 years. Rather than using pressed steel, as was originally the case, I made it in three parts (from thicker material), welded together and to the outrigger. The weld is not pretty but it is very solid. Before welding, I drilled holes for bolting the backplate onto the chassis, and drilled the left side to allow me to spot weld it along the outrigger side, as you can see in the picture above.


The use of bolts will not make the outrigger bracket removeable but means that I won't have to weld to the chassis. I can't tell you why, but I feel I should avoid welds on the chassis itself, if at all possible. When the bolts (which also hold the reinforcement plates) go in finally, I'll secure them with a bit of weld so that they won't undo.


I shall do the other side tomorrow.

How to cook a twerp


Here's a hot tip: if you are grinding metal and your hip is in the line of the sparks flying off, and you feel your hip getting rather hot, don't brazen it out thinking to yourself that you can take it because you are a "real man",

because you could be on fire!!.

Bloody Hell.....not just my overalls, but even my T-shirt was on fire, which means I was less than a second from becoming steak -or as one correspondent put it Car-B-Qued myself - as flames leapt at my hip! I instinctively whacked them out and straight off knew I'd had a very close shave.

Note to self: ....try not to stand in the line of fire. They aren't just harmful sparks.....they are tiny particles of very hot metal.