Replacing the outriggers
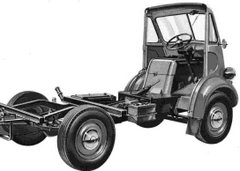
 The outriggers on the 101 had all but rusted away, so I removed what was left of the stubs and filleting-brackets, removed side rivets and generally cleaned up the area. I then cut along the length of a rather heavy duty, welded seam,square section channel to make a length of [ shape (squared U) shape channel for the outriggers. This was wider than the original, so I had to insert a packing piece, but rather than this being a compromise, it actually adds strength (being a splint) and made it easier to clamp the material square.
.JPG) After a bit of experimenting, the easiest way to line things up and level it was to turn the chassis over, with a friend's help, and clamp a length of shelf-slotting upright (to provide a level) across the main rails, and then clamp the outriggers to this to do the welding.
After a bit of experimenting, the easiest way to line things up and level it was to turn the chassis over, with a friend's help, and clamp a length of shelf-slotting upright (to provide a level) across the main rails, and then clamp the outriggers to this to do the welding.
.JPG) The outriggers are actually pretty solid - I find I can lift the chassis off its trolley with them - but I don't want to try standing on them until I have fitted the filleting brackets, which I am going to make tomorrow. Below is what's left of the old one.
The outriggers are actually pretty solid - I find I can lift the chassis off its trolley with them - but I don't want to try standing on them until I have fitted the filleting brackets, which I am going to make tomorrow. Below is what's left of the old one..JPG)
.JPG) Typically, I am going to slightly over-engineer these brackets because they support the step and the cab...and because my sheet steel is slightly too thin and otherwise I just have 4 mil plate, which I got at a scrappy and might as well use. I am not going to try to bend it, but will make it in 4 parts welded together. To give additional support and to reinforce the repair by drawing the old and new parts of outrigger together (in addition to the weld), I'm providing the bracket with the part drawn in orange, which will be drilled on the side opposite the suspension casting's domed rivets. (a belt and braces solution). This is the part of my van which suffered most from rust, so I am determined that the repair will be REALLY solid.
Typically, I am going to slightly over-engineer these brackets because they support the step and the cab...and because my sheet steel is slightly too thin and otherwise I just have 4 mil plate, which I got at a scrappy and might as well use. I am not going to try to bend it, but will make it in 4 parts welded together. To give additional support and to reinforce the repair by drawing the old and new parts of outrigger together (in addition to the weld), I'm providing the bracket with the part drawn in orange, which will be drilled on the side opposite the suspension casting's domed rivets. (a belt and braces solution). This is the part of my van which suffered most from rust, so I am determined that the repair will be REALLY solid.
 The outriggers on the 101 had all but rusted away, so I removed what was left of the stubs and filleting-brackets, removed side rivets and generally cleaned up the area. I then cut along the length of a rather heavy duty, welded seam,square section channel to make a length of [ shape (squared U) shape channel for the outriggers. This was wider than the original, so I had to insert a packing piece, but rather than this being a compromise, it actually adds strength (being a splint) and made it easier to clamp the material square.
.JPG) After a bit of experimenting, the easiest way to line things up and level it was to turn the chassis over, with a friend's help, and clamp a length of shelf-slotting upright (to provide a level) across the main rails, and then clamp the outriggers to this to do the welding.
After a bit of experimenting, the easiest way to line things up and level it was to turn the chassis over, with a friend's help, and clamp a length of shelf-slotting upright (to provide a level) across the main rails, and then clamp the outriggers to this to do the welding..JPG) The outriggers are actually pretty solid - I find I can lift the chassis off its trolley with them - but I don't want to try standing on them until I have fitted the filleting brackets, which I am going to make tomorrow. Below is what's left of the old one.
The outriggers are actually pretty solid - I find I can lift the chassis off its trolley with them - but I don't want to try standing on them until I have fitted the filleting brackets, which I am going to make tomorrow. Below is what's left of the old one..JPG)
.JPG) Typically, I am going to slightly over-engineer these brackets because they support the step and the cab...and because my sheet steel is slightly too thin and otherwise I just have 4 mil plate, which I got at a scrappy and might as well use. I am not going to try to bend it, but will make it in 4 parts welded together. To give additional support and to reinforce the repair by drawing the old and new parts of outrigger together (in addition to the weld), I'm providing the bracket with the part drawn in orange, which will be drilled on the side opposite the suspension casting's domed rivets. (a belt and braces solution). This is the part of my van which suffered most from rust, so I am determined that the repair will be REALLY solid.
Typically, I am going to slightly over-engineer these brackets because they support the step and the cab...and because my sheet steel is slightly too thin and otherwise I just have 4 mil plate, which I got at a scrappy and might as well use. I am not going to try to bend it, but will make it in 4 parts welded together. To give additional support and to reinforce the repair by drawing the old and new parts of outrigger together (in addition to the weld), I'm providing the bracket with the part drawn in orange, which will be drilled on the side opposite the suspension casting's domed rivets. (a belt and braces solution). This is the part of my van which suffered most from rust, so I am determined that the repair will be REALLY solid..JPG)









No comments:
Post a Comment