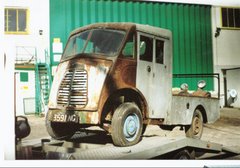
Tonight - in the middle of the night - (why, oh why, especially before a big day, am I up in the middle of the night!) I am applying POR-15, a several-stage process, which starts with Marine Clean (degreasing), drying, Metal Ready (keeping wet for 30 mins) rinse with water, allow to dry, as dry as a bone.
Metal ready is a rust remover that leaves a zinc phosphate coating on base metal, the perfect pre-primer for POR-15.
 When the surface was bone dry (achieved with a halogen lamp), I applied a coat of silver POR-15, recommended because it has tiny metal filler particles which fill pitting better than the black or clear versions....and worked liberal amounts into the back of the drip rail, where rust has created a rusted gulley which will need filling with POR-patch in 24hrs.
POR-Patch is a "pudding" version of the same substance and is used as a filler. I shall work a radius of it right along the front of the cab.

When it has had time to dry (2-6 hrs) to the touch, with slight finger drag, I'll give it its second coat and then leave it overnight....and for the next 24 hrs, after which I shall apply the pudding.....which is the bit I have put lots of faith in. It is meant to be the ultimate filler: hardens like steel but flexible, so won't chip or crack, will be waterproof and non-porous, will be moisture barrier, will be impervious to all fuels.
It says in the blurb that in lab tests it was applied to a metal box used as a raw sewage filter and put into action within hours of being treeated. The welds were checked after 6 months and no visible rusting had occurred. Mind you, they don't say what had occurred on the non-weld areas of the box, LOL.
If it is as strong as they say, as I hope, it will strengthen the compromised front at the bottom of the sub-windscreen channel, though I have filleted it with welds inside the channel anway.

The big day tomorrow, by the way, is the collection from Truman's store in London, of a Gold Seal B series engine with my mate with his trailer. That said, I talked to my B series mechanic today and he told me that he'd found a cylinder head and fitted it for me, so the engine will be a fall-back position.
4 a.m. before eyes closed!


 Above, the panels were then bolted to runners on the cab (separate from the workpiece, so as to ensure correct alignment) and the top edge was cramped to the channel and tack welded, care being taken to tack the dash-panel, but not the cab panels, which were then removed.