Apologies for the formating. I don't know why,
 but it reformated itself a year or two
ago and cannot be brought back under control

Easter '06
The wreck of the Morris had been driven into the ground and abandoned at the back of
“the Goat Lady’s” farm
in Gislingham in 1964, where it had been seen by members of the
Cambridge-Oxford Owners Club about 15 years ago,
when they had rescued a similarly ditched A55. What this tipster in the pub thought was a
J had last been seen there about eight years ago and on the strength of this alone,
I went to hunt for it in north Suffolk.
The postmaster at Gislingham was very helpful and filled me in on the detail. The Goat Lady, as she was known by locals died in the last eighteen months and had been in her nineties. The land now belongs to her neighbours. I was given directions.
When I eventually found the old lady’s property it was derelict with the hulks of various uninteresting seventies cars beyond hope in the front yard and throughout areas of copse and overgrowth peppered with goat huts. I gave up hope; there appeared to be nothing desirable here.
But as I drove out of the village I saw a Bedford RL peeping out above a garden wall and thought that if anyone would know of a local J type, this lorry’s owner would. I was in luck. He told me of a pathway following a stream which would take me to the woods at the back of the old lady’s property. Following these directions I eventually saw the familiar and extremely exciting sight of a J Type split screen through the trees.
I jumped the stream and nosed around between the hulks of two Bedford CAs an A55 and picked my way
to the J which, to my joy was not a J at all, but my type, an Austin 101. It was in a diabolical condition…
.with its back broken and almost nothing apparently worth saving on her. It did however have the front grille panel,
which is this poor man’s Holy Grail because my 101, curiously, has a Morris panel.

I wrote the landowner a letter telling him how delighted
I was to find that he had the wreck on his land and telling
him that members of the owners’ club would be interested and asking if it would be at
all possible to salvage some parts. And then I waited a couple of days,
jumping every time the phone rang.
When he did get in touch, Ted (name changed) was an absolutely charming chap and only
too pleased to help. He invited me to have anything I wanted. He said that it was nice to know that
there was someone out there madder than him. A couple of days later I went back and Ted and I
inspected the van more closely. He kept chuckling! It was incredibly sad. If someone had only
rescued it a couple of years ago, it might have been saveable. I cleaned up the wreck,
making two piles, one of interesting bits, the other of everything else.
Infuriatingly, having expressed my interest in the wreck, local yobs went on a wrecking
spree that night smashing every pane of glass on a vehicle which had been otherwise undisturbed
for 40 years.
I came back with a friend and we worked for a few hours removing the few useful bits.
On Harvey Pitcher’s advice I took the instruments and the casting between the air filter and the
carbs and a few other bits. Then we were invited to have a cuppa with Ted and his wife Mary and
their cat, Big Dick! They are a lovely couple, both retired teachers and we really hit it off; they are
probably the best find of the whole adventure. I returned a few days later on a whim and took the cab scuttle,
without any clear idea why because it disintigrated as I lifted it, but it has since yielded sections of salvable
channel to replace rusted sections around my windscreen.
 Top right of the cab in this picture, for instance, is a useful section. (See this link on cab surgery).
The Goat Lady, Ted told me, was Miss Beatrice Journet, a rather eccentric goat farmer,
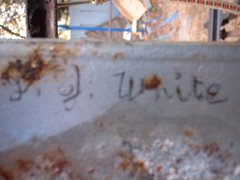
latterly, who had been descended from French Hugenots. Miss Journet had at one time
been a draughtswoman, evidenced by rolls of drawings found in the back of the van with her
name on them in stencilled letters. I also found a dress maker’s dummy and piles of mouse-nibbled
Practical Housekeeping magazines from the ‘50s and ‘60s and, very spookily, a shoe sitting
on the accelerator pedal. In the back of the neighbouring Bedford CA I found about two hundred
pairs of ladies’ shoes!
The 101’s bodywork had collapsed. The roof had an interesting roof-rack, which we rescued
and which a nice chap called Brian will put on his GPO van. Trumans came up with me last time
and we got him some pieces he’d wanted. It was good to meet him at last, because we have been
talking and writing for a little while now. We are agreed that it is important to help each other out.
Funnily enough, the day I found the wreck, he offered me an ex-stock front panel which has never
 been used….and therein lies another amazing tale.
It is very sad indeed that this Austin 101 will never be saved, but it has been a useful donor and
just having found it has been a great adventure. I didn’t find its registration or its chassis number,
but its engine number was 15JD-U-L 2046. I found the remains of its tax disc with only the year
visible. Utterly typical that my “barn find” should be such a no-hoper, but that’s life and even a
terrible wreck can be a lot of fun. Also, it is encouraging to see an Austin 101 in even worse
condition than the one I am very slowly restoring.

I first wrote the above for the J-Type owners club magazine and sadly,
since then Ted has written to say that the land has been cleared for development
and what was left of the 101 is no more.
( Why the bloody hell doesn't this compiler retain the formatting, indents, line-spaces I put in!? )
March 4th
Just got off the phone to Ted, who tells me that now, less than a whole year since I discovered the derelict van, which had stood there all those years, 4 houses stand on that land! It seems incredible. What timing!
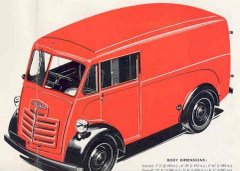
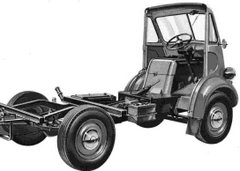
 Concertina doors are a novel feature of the milk-float special but I don't like three aspects of the way these were coachbuilt: Firstly, the necessary central pillar in the door creates a blind spot in the middle of the driver's window. Secondly, the top of the door window does not line up with the top of the quarterlight, which is rather ugly. I am going to raise the height of the doors to correct this. Thirdly, the way the doors open inwards meant that the coachbuilder could not include the moulding line, visible on the scuttle, as it would snarl up the hinge. I need to find a hinge which expands as it opens - to accommodate the moulding, which is a distinctive aestheic feature of the J-Type.

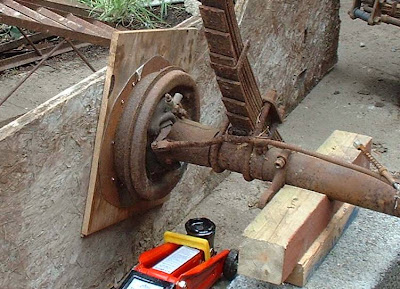
n.jpg) Eventually, I had the cheek to ask a local garage whose manager is keen on Morris Minors (and who I confidently hoped would be sympathetic) if I could use his 30 Ton press....and he agreed. I had wondered if he'd say that for insurance purposes, one of his blokes would have to do it...but he just let me get on with it. Good man.
Eventually, I had the cheek to ask a local garage whose manager is keen on Morris Minors (and who I confidently hoped would be sympathetic) if I could use his 30 Ton press....and he agreed. I had wondered if he'd say that for insurance purposes, one of his blokes would have to do it...but he just let me get on with it. Good man..JPG)
.JPG)

.JPG)
.JPG)
.JPG)
.JPG)
.JPG)
.JPG)
.JPG)
.JPG)
.JPG)

.JPG)
.JPG)
.JPG)
.JPG)

.JPG)


+beneath+nearside.JPG)
.JPG)
.JPG)
.JPG)
.JPG)
.JPG)
.JPG)
.JPG)
.JPG)
+rough+but+strong.JPG)
+before+clean-up+grind.JPG)
+offside+cleaned+up.JPG)
+bolt+on+wing+etc.JPG)


