Thursday 30 August 2007

Progress this summer

I have achieved quite a lot this summer (schools back next week), but not as much as I'd have liked; everything takes so much longer than you expect. August in the blog archive contains 20 articles, but to summarise, this month's achievements break into four sections: the sourcing of parts, the making of others, the restoring of the engine and negotiations with neighbours.

Parts

I have bought wheel cylinders, wheel bearings, a fuel tank, VHT paint, found two wheels (one of mine was wrong and I didn't have a spare) and hard-to-get domed cold rivets for the leaf-springs. Magpie has also provided info on windscreen rubber profiles and how to fit them, wheel sizing, etc (will do a piece on this); Truman has told me that I can get an exhaust made up fo £75 - and he will collect it for me! I have found someone to do a thoroughly good job of recoring my radiator, after I have modified the frames from one provided by Colin to replace the completely rusted away ones on the radiator Truman very kindly gave me earlier this year. I had hydraulic brake pipes made up (ready flared and with threaded fittings), using dimensions from the original parts manual.

I shall be making up a parts source list in a column on the right of the blog in due course. In the meantime, Truman's blog is a useful place to look for ideas.

Fabrication

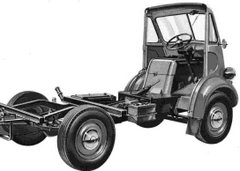
I made up the radiator support, the driver's side panel, the radiator baffle, cleaned up the front leaf springs, made chassis reinforcing plates and outriggers, did some experiments with the doors using a template, made a trolley for the cab front and reorganised the workshop to work on the chassis - ready to reassemble the parts on it.

Engine

The highlight of the summer - Colin got the engine finished! Marvellous. I probably should have done it myself, for the complete experience, but I am on a tight schedule and anyway am doing lots of processes other J Type owners are never forced to tackle. This way I have had an expert on the job and have been spared the irritation and frustration of having to research every stage and try to find parts I don't know the names of. And I haven't needed to work out how much wear on old parts I can allow, etc. No, Colin was by far the very best solution.

Negotiations

I'm glad to say that I have got convenient storage and workshop space for the van once my next door neighbour gets her garden back at the start of November, and she has even agreed (in return for me replacing her fence) for me to have a gate through to her neighbour's garage, which is where my van will be. At last I won't be land-locked! I have until then to get both sets of leafsprings sorted out, the axles back on the chassis, the brakes reassembled, the steering reassembled...and the wheels on...so that I can steer-roll the lot through the gardens in two months' time. It all begins to feel possible now.


It WILL be done for the 60th Anniversary of the J Type in June '08! Brilliant! That means that next summer I can do something else.....for a change!

Replacing the outriggers

The outriggers on the 101 had all but rusted away, so I removed what was left of the stubs and filleting-brackets, removed side rivets and generally cleaned up the area. I then cut along the length of a rather heavy duty, welded seam,square section channel to make a length of [ shape (squared U) shape channel for the outriggers. This was wider than the original, so I had to insert a packing piece, but rather than this being a compromise, it actually adds strength (being a splint) and made it easier to clamp the material square.

After a bit of experimenting, the easiest way to line things up and level it was to turn the chassis over, with a friend's help, and clamp a length of shelf-slotting upright (to provide a level) across the main rails, and then clamp the outriggers to this to do the welding.

The outriggers are actually pretty solid - I find I can lift the chassis off its trolley with them - but I don't want to try standing on them until I have fitted the filleting brackets, which I am going to make tomorrow. Below is what's left of the old one.

Typically, I am going to slightly over-engineer these brackets because they support the step and the cab...and because my sheet steel is slightly too thin and otherwise I just have 4 mil plate, which I got at a scrappy and might as well use. I am not going to try to bend it, but will make it in 4 parts welded together. To give additional support and to reinforce the repair by drawing the old and new parts of outrigger together (in addition to the weld), I'm providing the bracket with the part drawn in orange, which will be drilled on the side opposite the suspension casting's domed rivets. (a belt and braces solution). This is the part of my van which suffered most from rust, so I am determined that the repair will be REALLY solid.


Saturday 25 August 2007

Chassis reinforcing plates


I turned the chassis over and removed the severely rusted remains of outriggers and their supports to discover that the chassis beneath had suffered quite badly from corrosion, so I bought some 4mm plate from a convenient local scrap merchant (along with some angle iron to repair the outriggers) and cut and fitted it as snugly-fitting reinforcing plate inside the chassis rails.

On the advice of a friend, I won't be welding them in place, but will be bolting them with high tensile bolts through existing holes (the bolts visible here are only temporary). I'll treat them against rust, then fix them in place when I bolt on those things for which the holes were designed. I chain-drilled holes to accomodate the domes of those rivets which I am not removing. But I have removed the rivets which held the outrigger supports and will bolt the replacements in place.

Thursday 23 August 2007

Fantastic - 1st Start-up (for me, anyway)


Fresh from my phone.....completely unedited, jumpy, poorly defined etc.....but none of that matters because this is it - we get to see my engine actually running again.


When Colin took it away it was a great big, seized, greasy lump of rust.

She Goes!

Colin tells me the engine is going! I am off to see it tonight. Excellent.

I'll see if I can't film the start-up.

Mr Magpie and Billie Piper


I have been exchanging emails the last few days with "Mr Magpie", owner of the van featured in the Dr Who episode where an alien takes the form of the Watch with Mother presenter (Maureen Lipman) and sucks people's life-force out of them through their TV Sets, which have been supplied to them by Mr Magpie.

I first met Magpie at Gaydon a few years ago when he was then displaying 3891 EV (the Austin 101 truck in my "Correct 101 Face" section on the right). It was he who bought the blue builder's truck that Truman and I had hoped to buy together, and is making great progress with its repainting; rather unusually, using housepaint.

We made contact again when I bought a fuel tank from him on ebay for about a quid, which I am due to collect shortly, along with a pair of 16" wheels, which he has very kindly supplied for a song....thereby restoring my faith in the kindness of J type enthusiasts (after the Brian Squirrell fiasco).

Getting back to Dr Who, Magpie tells me he met Billie Piper, who admired his van. Lucky beggar. He ought to get one of those blue and white plaques you see outside notable buildings, testifying to the fact. Sigh, I'd have been admiring Billie.


.

Wednesday 22 August 2007

An Austin 101 in 00 model railway scale


I was having an idle search on ebay on Sunday and spotted three J Types in 00 scale (1:76)! Fantastic!

They are Classix, by Pocketbond. Diecast with nicely proportioned wheels (unlike the Corgi ones, by the way), there is a green fruit and veg van, a British Railways one (of course!) and the 101 is a Home Dairies Ltd van with a Milk logo on the side.

I ordered all three from Les (known on ebay as toy444). But what really delighted me about the 101, when it arrived, is that it isn't just a J Type van which has been painted to look the part, but actually has the correct front grille.

Superb!

Sunday 19 August 2007

Logistics, Logistics, Logistics (or, why everything takes SO long)

As I explained earlier, I do not have a conventional garage. For one thing it is landlocked; I don't have road access. For another, I am doing a complete restoration (every single bit dismantled) in a workshop no longer than chassis itself. So the whole project has been a logistical nightmare.

Last night I made a new trolley to manoeuvre the cab scuttle around, and today my good friend, John, came round and helped me get the scuttle on to it. Then we moved everything out of the rear workshop into the front and I then created space for the scuttle by moving a shelf, and we put the chassis onto my main trolley, which means that I'll be able to move it about in my tight space.


Here's a rather fuzzy picture of the shelving, showing the way the scuttle has been parked on its very nimble trolley, under the top shelf.


Next, I need to repair the outriggers, then start work on suspension, hydraulics, etc. The project will start stepping up apace now. I will move the project to the neighbour's once I have a rolling chassis....And I'll complete it there.

Other good news is that my next door neighbour today agreed my timetable for taking the van out through her garden and into her neighbour's garage...and has agreed to let me put a gate from her garden into his, to give me easy access to the garage (without having to disturb him or his family).

Even if it isn't finished in time, I will definitely be taking my project to the J Type 60th anniversary in 2008, as I will be able to get it onto the road from the garage, even if only onto a trailer.

Friday 17 August 2007

Rusty bolts

Yesterday I removed the rear leaf springs. They'd obviously been firmly in place for the last fifty years and I was beginning to think I'd have to grind the bolts off when I suddenly remembered that I'd been given a tank of Rost Off by a friendly mechanic, so splashed some on and went for a cuppa, to give it time to work.

Quite a bit of walloping with a hammer was still needed to crack the rust, but all nuts very soon released and, once under way, the spanner could be yanked around without doing me an injury.

No nuts were damaged and the threads aren't that bad.
Good stuff! I wish I'd known about it when I started dismantling the van.


Wednesday 15 August 2007

Engine Guru


I have just got back from Little Blakenham, where I went to see Colin Smith, my engine guru, who is doing a marvellous rebuild of my engine. It is currently on his mobile test-bed, ready to be fired up next week, after he has finished doing the distributor. I was originally put in touch with Colin by the Cambridge-Oxford Owners Club after I met them at Ally Pally (see second half of this entry) early last year and enquired about B series engines, as their marque has them too.

Colin is enormously experienced with B series engines, though his cars generally have the larger 16 and 1800cc versions. His workshop is chocka-block with tools and spares, your old proverbial Aladdin's cave. I must post a picture sometime because words really cannot convey just how much good stuff he has. I'll also post some pictures of his cars, which look splendid.

It hasn't been easy. The original cylinder head was cracked and the replacement Colin found was also cracked. I then hoped that the engine Truman gave me would provide the head, but Colin told me that he had finally found an uncracked one and put it on.

Seeing how far the engine has come was the boost I've needed recently. This all seems much more possible now.

a silly distraction


Last night, having earlier discovered that there was a gap between the door and the rear of the cab...and decided that keeping the two sections on the jig was pointless, as the measurements did not need to be preserved, I removed the back and stored it. This has given me more room to move...but it meant that I am more likely to trip over the outriggers of my wheelie-jig....so I spent half an hour highlighting them with red oxide and yellow housepaint. I was only going to do the outriggers, but got carried away.

perhaps the hardest part of restoring

Perhaps the most difficult thing about restoring a J Type is that the club does not have a technical branch or a spares list. This means that any restorer is forced to do a hell of a lot of research to source parts...and it is a very long winded process. Thank goodness for the internet!

The problem is not helped by the fact that none of the parts numbers are now relevant...or recognised by anyone. So reassembling anything on the van involves tracking down parts, one at a time, from disparate suppliers...and then waiting and waiting for them to arrive (which, this week, has involved a lot of stress).

I took my shopping list to the autojumble with its mythical 35 stalls (yeah, right!) and came away with nothing, except that I bumped into Martin who gave me the hot tip that the oil seals I was looking for could be bought in Ipswich from East Anglia Bearings, so that solved one problem at least.

Yesterday I went with a mate, John (himself a knowledgeable technology bod), to Suffolk Fasteners and the chap there was absolutely incredible; we were both very impressed. He can just look at any nut or bolt and before he has even reached for gauge, tell you with some certainty what size it is, what its pitch is, etc. He took the mick a bit about odd-bod amateurs like myself who only want one or two bolts at a time, when most of his clients want large orders, but he was patient and attentive, all the same. He has photos around the shop of various amateur projects: racing cars, tractors, vintage cars etc....and reminded me as I left to bring in one of my project.

I most heartily recommend this company, especially the branch we visited in Ipswich. He supplied me with some cold rivets for putting my leafsprings back together.....and helped me identify several tricky threads. It was from them that I bought the allen bolts for fixing the panels in place in the cab a few weeks ago. I shall definitely be going back.

Today I leapt out of bed, possibly straining my back again, to receive a parcel from MG Services, Heathrow, containing 4 wheel cylinders for the front axle, which I purchased on ebay for about £100. They look the business.....John will be irked; he and I spent a lot of time getting the pistons out of the old ones in the belief that we had no alternative but to restore them. It is such a relief having new parts. You can get pretty sick of endlessly dealing with ropey, rusty, seized and worn old parts, thinking you have no alternative.

I am planning on doing a list of suppliers on the right, rather as Truman has done on his blog.

Saturday 11 August 2007

Autojumble shopping list

Still feeling a bit over-awed by the months ahead; such a lot to do, but have been down in the workshop this afternoon and bagging up some parts to take with me to an autojumble tomorrow. It is something that has struck me whenever I have gone to a show, that I should have come with a shopping list. I also printed off some pages from the manual, so as to identify parts.

I washed some parts in paraffin and having studied the drawings, now feel more confident with the front axle assembly, at least. Among other parts, I need some oil seals...the ones with the tiny curtain-wire style of spring in them.

I also fitted my nearside mirror to my Ford Prefect today.

Got to feel like every day I am making at least SOME progress.

hassle and discouragement


Feeling a bit discouraged. Had a few recent hold-ups. The radiator can't be re-cored until next week because I need to get some side frames by cannibalising a mate's rad, the wheel cylinders for my front axle have been delayed by a problem with Paypal and the cab is out of alignment. The other problems will be fine but the last one is going to be trickier.


I had hoped to reconstruct the cab entirely on my wheelie-jig, but it is clear that I will have to complete the arches, back and roof on the chassis. I discovered this when I made up a wooden door template to try to work out how much adjustment would have to be done to the door height to line the door lights (windows) up with the quarterlights. I cut the wood with slack at the top for making markings (and incidentally, I adjusted the width so that it does not include the overlaps...so that it is the actual width of the doorway).


When I offered it up, there was a considerable gap from front to back. I used a plumb bob and spirit level to right the uprights, but there was still a significant gap. I think I will have caused this in the course of changing jigs etc.


So, anyway, I am now going to concentrate on running parts and leave the cab adjustment for when the scuttle is mounted back on the chassis, and once the engine is back in the van.


To give me room to move in the workshop, I think I will mount the scuttle on the chassis as soon as the chassis is ready to roll, but leave the arches and rear of cab until the whole thing is in its new garage home two doors down the road.


God almighty, it's an involved business...especially when you have very little room to move. Next time I'll stick to motorbikes!


I don't know if I shall be finished in time for the 2008, 60th anniversary, but at least then I shall be able to get it out of my neighbour's garage and onto a trailer and tow the project there. Right now it is land-locked.

Wednesday 8 August 2007

wow - that's fast! Wheel Bearings

My bearings arrived today. They said allow two days but I got next day delivery! They look the business. They arrive with rubber seals and I am not sure whether to leave these on. Will keep you posted, but in the meantime I can highly recommend Arc Euro (see their link below).

Tuesday 7 August 2007

sourcing parts


I learnt a valuable lesson today, which is that if you source parts from a classic car parts supplier you will pay top dollar for something which may be available elsewhere as something more mundane.

I initially contacted a well known classic car part supplier and was quoted a wopping £25 per ball race to go in my front wheels....that's £100 worth! He said he didn't actually have an kits for J Types, but that the bearings are common to other vehicles, and suggested one. He suggested I checked the numbers on the originals and get back to him.

I did check the numbers and I Googled them and found a source, Arc Euro Trade Ltd....rang them to check the details...and ordered all four races (inner and outer x2) for £25, including postage! They normally do stuff for model engineering, which put me off, but the part numbers are right and the dimensions seem to work...so we will see.

That is a useful saving because I then talked to a radiator recoring company and the price for that is about £80 more than I anticipated. I shall be blogging the re-coring process; they say I can watch it and photograph it!

The bearings should be here in the next two days and I shall then finish the front axle.

Leaf Springs


I try to make at least some progress on the 101 every day, even if it doesn't seem a hell of a lot. I started out by putting a line of weld around the patch on the inner R/H panel and then I finished cleaning up the individual leaves of my two front leaf springs. As they are £300 a pair for replacements I thought I'd see what I could do to just clean these up. I have no idea if they will be springy enough.

I had to remove the cold rivets by first grinding off the dome heads then removing the studs using the 12 ton press, which made a hell of an alarming noise each time when it gave - so that I had to keep reassuring myself that the leaf had not broken.


I next need to find out where to get cold rivets and the correct procedure for making shackles like these, presumably by applying heat to the metal before bending it. I also wonder about the tube around the bolts. Anyone know?

Friday 3 August 2007

Plate - top - blanking radiator (Part # AMK5053)


After making adjustments to the radiator frame I made this upper panel. As I am not quite sure of the purpose of the slots, I have marked but haven't cut them. This is because the shrinkage caused by my bending may have slightly moved them and I think it might be best to cut them when fitting the panel to the van later.

This reminds me of the development of the Bensen autogyro. Bensen acquired the plans for the Hafner rotochute, a one man aerial assault rotor glider designed by the man who was the subject of my dissertation for my degree, Raoul Hafner, later the designer of Britain's first helicopter, the Bristol Sycamore. Hafner designed the rotochute during the war with a hook affair under its main chassis longeron. Unsure what this was for Bensen retained it in his design, which he marketed as a civilian gyro-glider. It was later revealed that the redundant mechanism had been intended as a means of carrying a Bren gun under the aircraft.

I don't think my panel slots are redundant, but until I am sure what they are for I won't cut them.

Tomorrow I shall make the Panel- interior - front R/H, using the original as a pattern, then go back to working on my front leaf springs, which are dismantled and half de-rusted, but which need finishing before I work out how to make the shackles and get hold of cold rivets.

Thursday 2 August 2007

bending - an exercise in problem solving


Today I cut out the net, bent it into shape and welded it up. The whole exercise was a problem solving one because all sorts of packing and forming was needed to create the right bends. It isn't finished just yet, as some finishing grinding is needed in some places and a tiny bit of welding is needed, but on the whole it came out very well.


When I popped up to the house for a break I checked the Tinworm mailbox and was pleased to hear from a man in Australia.... in Victoria, which is where my sister lives. He complimented Truman and me on the trouble we are going to to do proper restorations of our J Types. He is restoring one over there. Thanks mate. Keep in touch.

When I have finished the radiator frame tomorrow, I think I should do the inner panel R/H and then the upper radiator panel. Really chuffed with progress.


radiator frame


This afternoon (1st August) I clipped up a scan/print-out from my Parts Manual (15 on Plate CA) showing the radiator framework and studied the real thing, made measurements and marked out the net on some cold rolled 1.2mm sheet steel, cut out the basic shape with an angle grinder and fine cut some of it with my roller guillotine. I didn't use engineer's blue this time, but permanent marker, even though there will be a degree of error as the nib is quite large; but then again, much slack will be taken up by bending. I'll cut, bend and weld it up tomorrow.


Above you can see the radiator bay of the Goat Lady's van, which ironically, considering it had been abandoned in a field for 40 years or so, is in better condition than mine was when I got it; in fact my van had lost its radiator altogether. I am pointing to panel 20 [in drawing, top. Click on image to increase size] and most of the lower panel has gone, though you can see some of it to the right of the tap. I rescued the panel I am pointing to. I was excited because my van had lost this. It will be a pattern for a replacement to be made in the next few days.

Wednesday 1 August 2007

Panel- interior - front top L/H part # ANK2604


Today I made a replacement inner panel, the one the Parts Manual calls the Panel - interior - front L/H, from virgin heavy gauge cold rolled steel, which is the first bit of unrecycled steel I have used in years, now. I made it using the old, rusted panel as a pattern.

A mate (and his trailer) and I went to a stockholder a few days ago and I bought two sheets of 1.2mm (2x1m). I think I ought to have got a slightly lighter gauge (as the original material was thinner) but I am delighted with the strength of the panel I made today so I think the cab can only benefit by my decision.


I am so inspired by the result that it would seem churlish and a compromise to the finish not to replace the inner right hand panel as well. That is the job for tomorrow.
Incidentally, I was chuffed to bits to be told by Iain Mckenzie that I had done a good repair along the inside beneath the windscreen. He also tells me that he has my valence on his desk and will be sending it. Anyone who has not seen his work, which incidentally is excellent value for money, should take a look.